Shop our best deals online.
Shop Now
How to Lay Engineered Hardwood Flooring for Long-Lasting Results
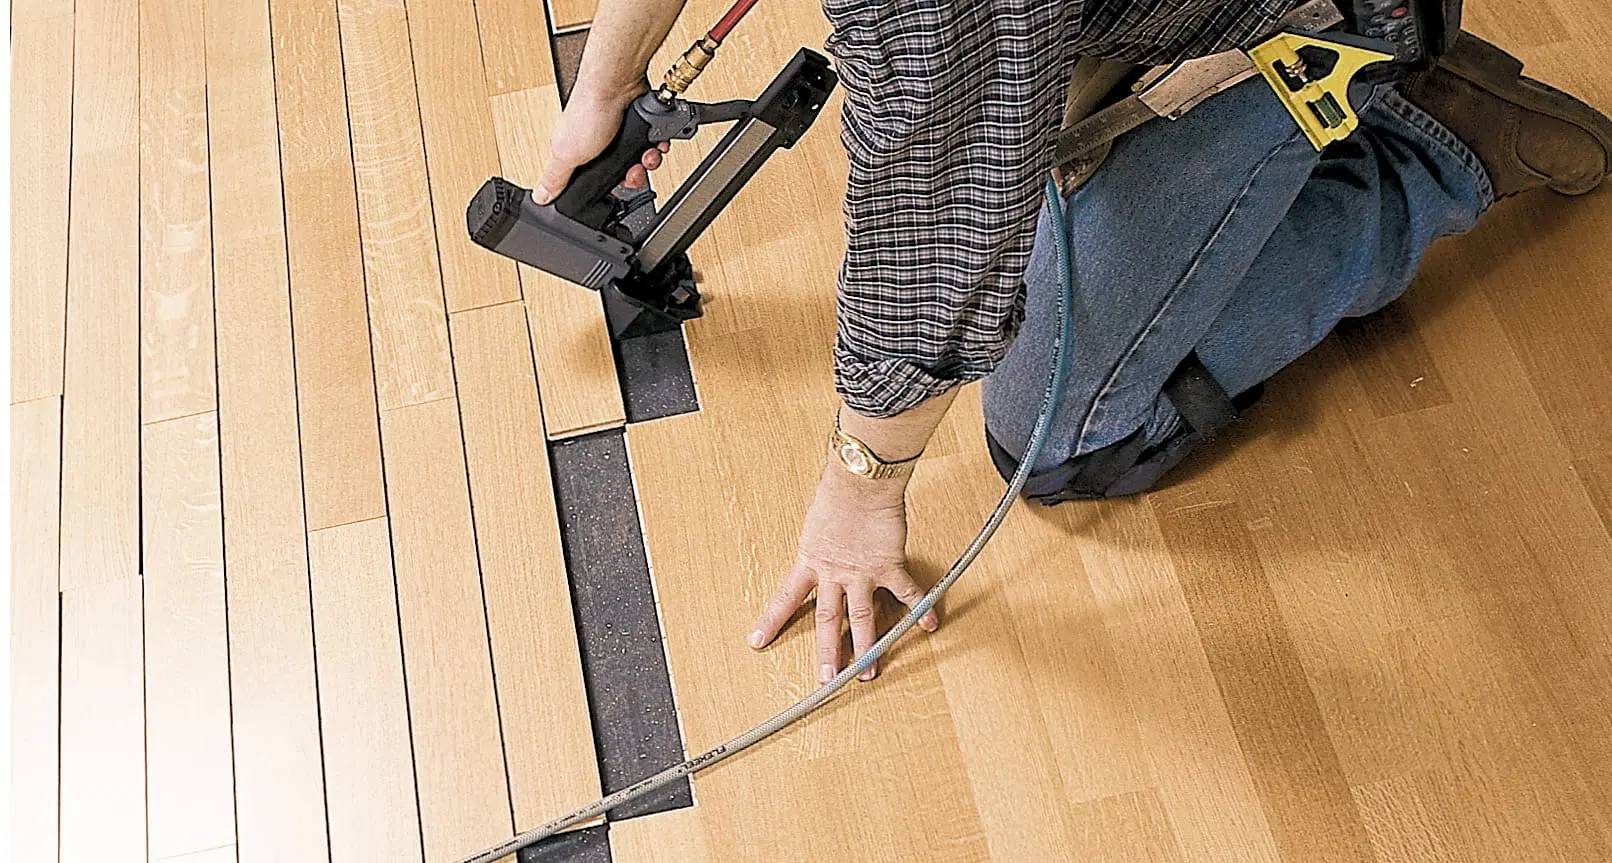
Table of Contents
- 1 Understanding Engineered Hardwood Flooring
- 2 Tools and Materials You’ll Need
- 3 Preparing the Subfloor
- 4 Acclimating the Engineered Wood Planks
- 5 Planning the Layout
- 6 Choosing the Installation Method
- 7 Laying the First Row
- 8 Continue Installing Across the Room
- 9 Finishing the Final Row
- 10 Installing Moldings and Transition Pieces
- 11 Cleaning and Post-Installation Care
- 12 Preventing Moisture Damage and Ensuring Longevity
- 13 Conclusion: Lasting Beauty Through Proper Installation
- 14 FAQs
- 14.1 1. How to lay engineered hardwood flooring on plywood?
- 14.2 2. How to lay engineered hardwood flooring on a wood subfloor?
- 14.3 3. How to install engineered hardwood flooring on concrete?
- 14.4 4. What is the best way to install engineered hardwood flooring?
- 14.5 5. Is it better to glue or float an engineered wood floor?
When it comes to blending timeless beauty with modern performance, engineered wood flooring stands out as one of the most popular choices for homeowners today. Designed for stability, elegance, and practicality, engineered hardwood mimics the appearance of solid hardwood while offering better resistance to moisture damage and temperature fluctuations.
Whether you’re updating your living room, finishing a basement, or remodeling high-traffic areas, learning how to lay engineered hardwood flooring properly ensures your floors not only look stunning but also last for decades. This guide walks you through every step, from preparing the subfloor to installing your engineered wood planks, so you can achieve a professional finish without the stress.
Understanding Engineered Hardwood Flooring
Before diving into installation, it’s important to understand what makes engineered hardwood different from solid hardwood.
Engineered wood flooring consists of multiple layers:
- A top veneer of real hardwood (such as oak, maple, or walnut) that provides natural beauty and texture.
- Several layers of plywood or high-density fiberboard (HDF) beneath, offering strength and dimensional stability.
This layered construction helps prevent warping and moisture damage, making engineered hardwood a great choice for spaces like basements, kitchens, and high-traffic zones.
Tools and Materials You’ll Need
Before you start laying your flooring, gather the following materials and tools for a smooth installation process:
- Engineered wood planks
- Moisture barrier or vapor barrier (for concrete subfloors)
- Underlayment (foam or cork)
- Flooring adhesive (for glue-down installations)
- Flooring nails or a nail gun (for nail-down installations)
- Utility knife
- Tape measure
- Tapping block and pull bar
- Rubber mallet
- Spacers for maintaining expansion gaps
- Safety gear (gloves, knee pads, and eye protection)
Having all flooring installation materials ready ensures the process runs efficiently and prevents interruptions once you begin installing.
Preparing the Subfloor
Proper subfloor preparation is essential to prevent uneven surfaces, squeaks, or future moisture damage.
1. Inspect the Subfloor:
Your subfloor, whether concrete or plywood, must be clean, level and dry. Remove all debris, dust, and old adhesive. Any uneven areas greater than 3mm should be sanded down or filled with leveling compound.
2. Conduct a Moisture Test:
Moisture can be a silent enemy of hardwood floors. Use a moisture test kit to ensure the subfloor is within the acceptable range (typically below 12%). Excess moisture can cause warping and separation later on.
3. Install a Moisture or Vapor Barrier:
For concrete subfloors, always install a moisture barrier or vapor barrier before laying the planks. This layer prevents moisture from seeping upward and damaging the wood. For plywood subfloors, an underlayment provides cushioning, sound insulation, and additional protection.
Acclimating the Engineered Wood Planks
Before installation, it’s crucial to acclimate your engineered wood planks to the room’s environment.
Store the boxes of flooring flat in the installation area for at least 48 to 72 hours. This allows the planks to adjust to the room’s temperature and humidity levels. Skipping this step may lead to expansion or contraction, causing gaps or buckling after installation.
Planning the Layout
A well-planned layout ensures your flooring looks balanced and professional.
- Start along the longest wall in the room, typically opposite the main entrance.
- Use a chalk line to mark your starting point and maintain alignment.
- Remember to leave expansion gaps (typically ¼ inch) around the perimeter of the room and near walls, columns, or transition areas. These gaps allow for natural movement of the flooring due to humidity changes.
If your flooring connects to other rooms, plan your transition areas carefully to maintain a consistent flow and visual appeal. You can also explore Why Engineered Hardwood is the Best Flooring Choice for High Humidity Areas here.
Choosing the Installation Method
There are three main installation methods for engineered wood flooring, depending on your subfloor type and personal preference:
a. Floating Installation:
The planks lock together using a click-and-lock system. This method requires no glue or nails and is ideal for DIY installers. It’s perfect for basements or over concrete subfloors when used with a moisture barrier.
b. Glue-Down Installation:
In this method, a flooring adhesive is spread evenly on the subfloor using a trowel. Each engineered wood plank is then pressed into the adhesive. This method provides excellent stability and sound absorption, making it ideal for high-traffic zones.
c. Nail-Down Installation:
For plywood subfloors, planks are secured using flooring nails or a nail gun. This traditional method provides a solid feel underfoot and prevents shifting. Use a rubber mallet and tapping block to ensure tight seams.
Laying the First Row
Start by laying the first row along your marked line, with the tongue side facing the wall. Place spacers between the planks and wall to maintain consistent expansion gaps.
Cut the final plank of each row with a utility knife or saw to fit. Begin the second row with the leftover piece from the first row to stagger the seams, this enhances the natural pattern of the oak, maple, or walnut grains and strengthens the overall floor structure.
For floating installations, ensure each plank clicks securely into the next. For glue-down or nail-down methods, follow manufacturer recommendations for adhesive or nail spacing.
Continue Installing Across the Room
Once the first few rows are in place, continue laying the planks across the room. Maintain consistent spacing between seams for a uniform look.
Use a tapping block and rubber mallet to gently lock planks together without damaging the edges. Check alignment frequently and adjust as needed.
At doorways or transition areas, use matching transition strips or moldings to connect the engineered wood with other flooring materials such as tile or carpet. This not only enhances the design but also provides a seamless flow between spaces.
Finishing the Final Row
As you reach the last row, measure carefully to ensure a perfect fit. You may need to trim the planks lengthwise with a utility knife or table saw.
Place spacers along the wall and fit the final row into position using a pull bar. Make sure the last planks are snugly joined with no visible gaps. Once all planks are installed, remove the spacers and check the expansion gaps around the perimeter.
Installing Moldings and Transition Pieces
Once the flooring is fully installed, finish the job with baseboards and transition strips.
- Baseboards: Reinstall or add new baseboards to cover the expansion gaps along the walls.
- Transition Strips: Use transition pieces at doorways or where your engineered hardwood meets another flooring type. These pieces ensure smooth movement between surfaces and protect plank edges from chipping.
Cleaning and Post-Installation Care
After installation, it’s important to properly clean and care for your new floors.
- Clean the surface: Use a damp cloth or microfiber mop to remove dust and debris. Avoid soaking the floor with water.
- Check for gaps or loose planks: If any planks have shifted, gently tap them back into place.
- Avoid heavy furniture: Wait at least 48 hours before placing furniture to allow adhesives (if used) to cure fully.
- Protect high-traffic zones: Use rugs or mats in high-traffic areas to minimize wear and maintain the floor’s beauty.
Regular maintenance, including gentle vacuuming and sweeping, will help preserve the shine and prevent scratches.
Preventing Moisture Damage and Ensuring Longevity
Engineered hardwood flooring is more resistant to moisture damage than solid hardwood, but it still requires care in humid environments.
- Control humidity: Maintain indoor humidity between 35%–55% to prevent expansion and contraction.
- Wipe spills immediately: Clean up liquids right away to avoid staining or warping.
- Add moisture protection: Consider a vapor barrier or moisture seal for basements or rooms with higher humidity.
- Inspect yearly: Check for any movement, cracks, or expansion gaps closing and address issues promptly.
Taking these precautions will ensure your engineered wood flooring remains durable, stable, and visually appealing for years.
Conclusion: Lasting Beauty Through Proper Installation
Learning how to lay engineered hardwood flooring the right way is the foundation of long-lasting results. By preparing the subfloor, maintaining expansion gaps, and using the correct materials like underlayment and flooring adhesive, you can achieve a floor that’s as durable as it is beautiful.
Whether you’re installing it yourself or seeking expert help, Flooring Outlet & More offers everything you need, from premium engineered wood planks to professional installation guidance.
Transform your home today with flooring that combines elegance, performance, and longevity. Contact us to explore our collection and get expert help with your next flooring project.
FAQs
1. How to lay engineered hardwood flooring on plywood?
When installing engineered hardwood on plywood, ensure the subfloor is clean, dry, and level. Use a nail-down or glue-down method, depending on the plank thickness. Maintain expansion gaps around walls to allow natural movement caused by humidity changes.
2. How to lay engineered hardwood flooring on a wood subfloor?
To install on a wood subfloor, start by cleaning and leveling the surface. Use flooring nails or staples to secure the planks. Add an underlayment for sound absorption and comfort, ensuring the flooring remains stable and free of squeaks.
3. How to install engineered hardwood flooring on concrete?
Installing concrete subfloors requires a vapor barrier to prevent moisture damage. Choose a floating or glue-down method. If gluing, use a high-quality flooring adhesive designed for concrete. Ensure the concrete is dry and level before installation begins.
4. What is the best way to install engineered hardwood flooring?
The best installation method depends on the subfloor type. For concrete, use a floating or glue-down system; for plywood, nail-down offers the best results. Always maintain expansion gaps and test for moisture to ensure long-term durability.
5. Is it better to glue or float an engineered wood floor?
Both methods work well depending on the environment. Glue-down provides better sound insulation and stability for high-traffic zones, while floating floors are easier to install and ideal for areas like basements or where subfloor movement may occur.


