Shop our best deals online.
Shop Now
How to Deep Clean Hardwood Floors Without Warping the Finish
Table of Contents
- 1 Why Deep Cleaning Is Different From Regular Cleaning
- 2 What You Will Need Before You Start
- 3 Step 1: Clear and Dry Sweep the Entire Floor
- 4 Step 2: Identify Problem Areas Before Mopping
- 5 Step 3: Mix Your Cleaning Solution Correctly
- 6 Step 4: Mop With a Barely Damp Microfiber Mop
- 7 Step 5: Address High-Traffic Zones With Extra Care
- 8 Step 6: Dry the Floor Completely
- 9 Step 7: Optional Finish Refresher Application
- 10 Common Deep Cleaning Mistakes to Avoid
- 11 Building a Hardwood Floor Maintenance Routine That Works
- 12 Clean Right, Every Time
- 13 Frequently Asked Questions
- 13.1 Q: How often should I deep clean hardwood floors?
- 13.2 Q: Can I use vinegar to clean hardwood floors?
- 13.3 Q: What is the safest mop for deep cleaning hardwood floors?
- 13.4 Q: Why does my hardwood floor look dull after cleaning?
- 13.5 Q: Is deep cleaning hardwood floors the same for solid and engineered hardwood?
Knowing how to deep clean hardwood floors the right way is what separates a floor that stays beautiful for decades from one that dulls, warps, or deteriorates from improper care. Regular sweeping handles daily dust and debris, but over time, residue from cleaners, trapped grit, and built-up grime embed into the finish and dull the surface. Deep cleaning hardwood floors removes this buildup without damaging the protective finish that keeps the wood beneath safe. This guide walks you through the correct process, the right products to use, and the mistakes to avoid so your hardwood floor looks its best without suffering any damage in the process.
Why Deep Cleaning Is Different From Regular Cleaning
The Purpose of Routine Cleaning
Routine hardwood floor maintenance, sweeping, dry mopping, and light damp mopping, handles the surface layer of daily dirt and dust. It is quick, frequent, and essential. However, it does not remove the film that builds up from cleaning product residue, humidity fluctuations, and ground-in particles that work below the surface of the finish over months of use.
What Deep Cleaning Addresses
Deep cleaning hardwood floors targets what routine cleaning leaves behind. It restores the floor’s natural sheen, removes surface film and haze, and lifts dirt that has settled into grain texture and low points of the finish. Done correctly, it makes the floor look noticeably cleaner and brighter without any sanding or refinishing.
The Key Risk: Moisture
The most significant risk during any deep cleaning process is excess moisture. Hardwood flooring, both solid and engineered, is not waterproof. All hardwood flooring is vulnerable to moisture damage regardless of species or finish type. Water that sits on the surface or seeps into the seams between boards causes the wood fibers to swell, the finish to cloud, and the joints to weaken. Every deep cleaning method must keep moisture application minimal and controlled.
What You Will Need Before You Start
Gathering the right tools and products before you begin makes the process faster and reduces the temptation to improvise with products that can damage the floor.
Tools:
- Soft-bristle broom or dust mop
- Vacuum with a hard floor setting and no beater bar
- Microfiber flat mop
- Two clean buckets
- Clean microfiber cloths
Products:
- Hardwood floor cleaner specifically formulated for finished hardwood
- pH-neutral floor cleaning solution for stubborn buildup
- Hardwood floor polish or refresher product (optional, for finish restoration)
Avoid dish soap, vinegar, all-purpose household cleaners, and steam mops. These either strip the finish, leave residue, or force moisture into the wood at levels that cause lasting damage.
Step 1: Clear and Dry Sweep the Entire Floor
Why This Step Comes First
Before any liquid touches the floor, remove all loose dust, pet hair, crumbs, and grit completely. Grit left on the floor during wet cleaning becomes an abrasive that scratches the finish as the mop moves across it. This step is not optional.
How to Do It Correctly
Use a soft-bristle dust mop or a vacuum on the hard floor setting. Move in the direction of the wood grain rather than across it. Pay close attention to the edges along baseboards and the joints between boards where fine particles accumulate. For larger rooms, work systematically from one end to the other so you do not redistribute dust back over areas you have already cleaned.
Remove any area rugs and sweep beneath them as well. The debris that accumulates under rugs is often the source of the grinding sounds and surface scratches that appear over time.
Step 2: Identify Problem Areas Before Mopping
Check for Surface Haze and Buildup
Walk the floor in a raking light angle, ideally from a low window or doorway, and look for areas of dullness, cloudiness, or visible film. These are usually spots where cleaning product residue has built up over time. They require slightly more attention during the cleaning pass but do not need to be scrubbed aggressively.
Spot Check for Stubborn Stains
Identify any specific stains or marks that need targeted attention before the full mop pass. Common marks include heel scuffs, pet prints left by wet paws, dried spills with sticky residue, and grease marks near kitchen or dining areas.
Treating Specific Stains Before Mopping
| Stain Type | Recommended Treatment |
| Scuff marks | Rub gently with a clean tennis ball or soft eraser |
| Dried food or sticky residue | Dampen a cloth with hardwood cleaner and hold over the spot briefly before wiping |
| Grease marks | Apply a small amount of mineral spirits to a cloth and wipe carefully |
| Heel marks | Buff with a dry microfiber cloth using circular motion |
| Crayon or wax | Freeze with an ice pack in a bag to harden then gently scrape with a plastic scraper |
Always wipe the treated area dry immediately after spot treatment. Do not allow any moisture to sit on the surface.
Step 3: Mix Your Cleaning Solution Correctly
Use the Right Product
Choose a cleaner specifically labeled for finished hardwood floors. These products are formulated to lift grime without leaving residue, stripping the finish, or introducing excess moisture. Follow the dilution instructions on the label exactly. More product does not mean better results. Concentrated cleaner leaves a film that dulls the floor and attracts more dirt over time.
Prepare Two Buckets
Fill one bucket with the correctly diluted hardwood floor cleaner. Keep a second bucket with clean water nearby for rinsing the mop. This two-bucket method ensures you are not spreading dirty water back over a floor you are trying to clean hardwood floors properly.
Step 4: Mop With a Barely Damp Microfiber Mop
The Correct Moisture Level
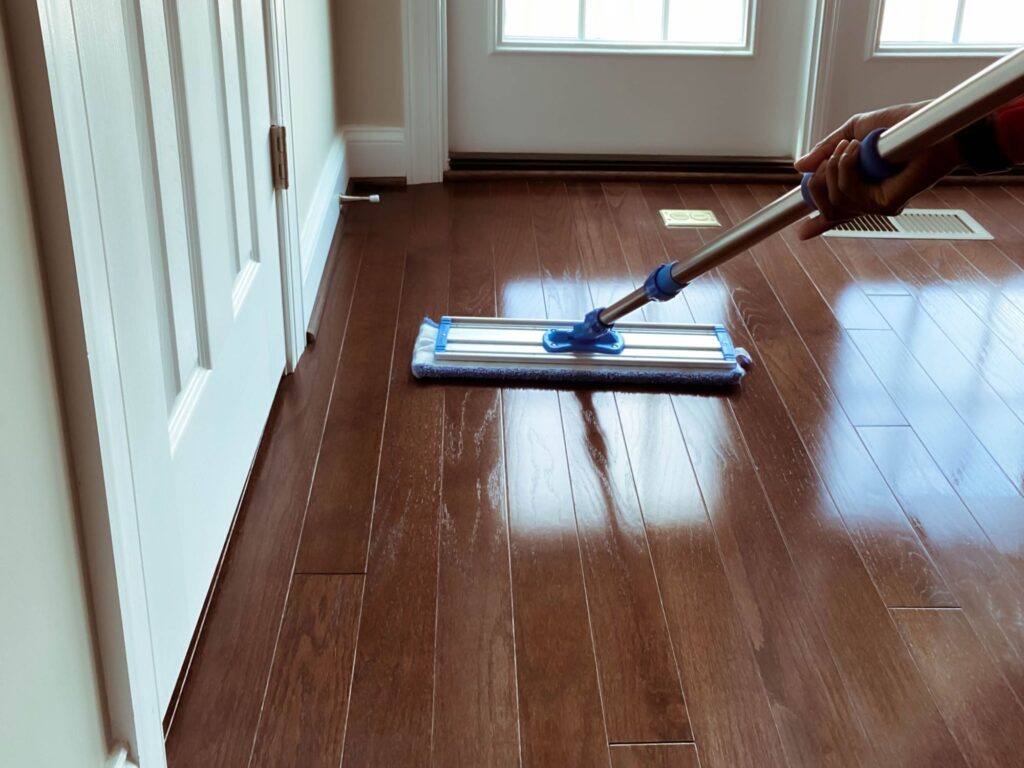
Wring the mop thoroughly until it is barely damp. When you press the mop head against your arm it should leave almost no moisture at all. This level of dryness is what protects the floor from moisture infiltration during the process.
Mopping Technique
Work in sections moving in the direction of the wood grain. Mop one section and immediately follow with a dry microfiber cloth or second pass with a dry mop head to remove any remaining moisture. Do not allow the floor to air dry with moisture sitting on it. Move steadily and methodically across the room.
Rinse the mop head in the clean water bucket frequently, then re-apply the cleaning solution from the first bucket. A dirty mop simply redistributes grime rather than removing it.
Do Not Use a Steam Mop
Steam mops force hot pressurized moisture directly into the wood grain and between planks. Even hardwood floors with strong factory finishes are damaged by steam over time. The heat and moisture combination degrades the adhesion layers in engineered hardwood and causes raised grain and finish clouding in solid hardwood. Never use a steam mop on any hardwood surface as part of your hardwood floor maintenance routine.
Step 5: Address High-Traffic Zones With Extra Care
Where Buildup Is Worst
Entryways, kitchen-to-living-room transitions, and areas in front of sofas and chairs accumulate the most visible buildup. These zones also tend to show the most dullness because the finish wears slightly faster from concentrated foot traffic.
How to Treat These Areas
Apply a slightly more concentrated pass of cleaner to these zones and allow it to sit for 30 seconds before wiping. Do not scrub aggressively. A second damp pass followed immediately by a dry wipe is usually enough to restore the surface sheen in these spots without any risk of finish damage.
For floors with significant buildup that does not lift with cleaning alone, a hardwood floor revitalizer product applied after the floor is fully dry can restore surface sheen without the need for full refinishing.
Step 6: Dry the Floor Completely
Why Complete Drying Matters
Any moisture remaining on the surface after cleaning can seep into the seams between boards, especially in older installations where the finish seal at the joint edges has worn slightly. Ensure the floor is completely dry before replacing furniture or allowing foot traffic.
Open windows if weather permits and run the HVAC system to circulate air through the room. In humid conditions, run a dehumidifier to pull excess airborne moisture out of the space. A fully dry floor after deep cleaning is what prevents the moisture-related cloudiness that sometimes appears after improper cleaning.
Step 7: Optional Finish Refresher Application
When a Refresher Is Appropriate
If the floor still looks dull after deep cleaning despite all product residue being removed, the finish itself may have thinned from years of normal wear. This is different from dirt buildup. A hardwood floor polish or finish refresher product fills in micro-scratches in the finish layer and restores the surface sheen without full sanding.
How to Apply It
Apply the refresher in a thin, even coat using a clean flat applicator or microfiber pad. Work in the direction of the grain. Allow it to cure for the time specified on the product label. Keep foot traffic off the floor during curing. A single thin coat is more effective than a thick one, which can leave streaks or trap bubbles in the finish layer.
This step is not a substitute for refinishing when the finish has worn through to the bare wood. If bare wood is visible in high-traffic areas, refinishing is the correct next step. Read How Can You Refinish Engineered Hardwood to understand when that process is needed.
Common Deep Cleaning Mistakes to Avoid
| Mistake | Why It Causes Damage |
| Using too much water | Causes swelling, warping, and joint damage |
| Using vinegar or dish soap | Strips finish and leaves residue that attracts more dirt |
| Leaving cleaner on the floor too long | Film buildup dulls finish and attracts grime |
| Using a steam mop | Forces moisture and heat into wood grain |
| Scrubbing with abrasive tools | Scratches and dulls the protective finish |
| Not drying the floor after mopping | Moisture seeps into seams and causes damage over time |
Building a Hardwood Floor Maintenance Routine That Works
Deep cleaning hardwood floors is most effective as part of a consistent routine rather than a reactive task done only when the floor looks noticeably dirty. A floor that is maintained well daily needs far less aggressive intervention during deep cleaning sessions.
Sweep or dust mop daily in high-traffic areas. Damp mop weekly using a hardwood-safe cleaner and a well-wrung microfiber mop. Wipe up any spills immediately rather than allowing them to sit. Place felt pads under all furniture legs and replace them when they show wear. Use doormats at every entry point to trap grit before it reaches the floor. Maintain indoor humidity between 35% and 55% year-round to prevent the wood from swelling and contracting excessively.
For a complete year-round approach, see How to Maintain Your Floors in Different Seasons.
Clean Right, Every Time
Deep cleaning hardwood floors does not require special equipment or professional services in most cases. It requires the right products, the right amount of moisture, and the right technique. Keep moisture minimal, work with the grain, dry immediately after mopping, and your floor will look noticeably brighter and cleaner without any risk to the finish beneath. A well-maintained hardwood floor rewards the care you put into it with decades of beauty that no other flooring type can quite match.
Visit Flooring Outlet & More to explore our range of solid hardwood and engineered hardwood flooring options and to find the right care products and installation materials to keep your floors performing at their best.
Frequently Asked Questions
Q: How often should I deep clean hardwood floors?
A: Deep cleaning hardwood floors two to four times per year is sufficient for most homes. High-traffic households with pets may benefit from quarterly sessions. Regular sweeping and damp mopping between deep cleans reduces how much buildup accumulates and makes each deep clean easier.
Q: Can I use vinegar to clean hardwood floors?
A: No. Vinegar is acidic and strips the protective finish over time. It also leaves a residue that attracts more dirt. Always use a cleaner specifically formulated for finished hardwood as part of your hardwood floor maintenance routine to avoid finish damage.
Q: What is the safest mop for deep cleaning hardwood floors?
A: A flat microfiber mop wrung until barely damp is the safest option for clean hardwood floors. Microfiber lifts dirt effectively without requiring excess moisture. Avoid string mops, sponge mops, and steam mops which all apply too much water or heat for safe hardwood use.
Q: Why does my hardwood floor look dull after cleaning?
A: Dullness after cleaning is usually caused by cleaning product residue left on the surface. Use less product and ensure you are rinsing the mop frequently. If dullness persists after proper cleaning, a hardwood floor refresher product can restore sheen without the need for full sanding or refinishing.
Q: Is deep cleaning hardwood floors the same for solid and engineered hardwood?
A: The process is essentially the same for both. The moisture restriction is equally important for both types since neither solid nor engineered hardwood is waterproof. Engineered hardwood may show finish wear more quickly in thinner veneer products so check refinishing potential before applying any abrasive or restorative product.
About The Author